Thursday, November 27, 2008

New Headliner

While power washing all the fabrics and headliner, the fabric came off. So we ordered more fabric. We bought some adhesive spray and used household staples to fasten the fabric to the headliner shell. Then we used up the last of the sound dampening material for the backside. It was a tight fit. The sound dampening material was a bit thicker than the original backside material.

Lovejoy Couplings

Lovejoy coupling has arrived from drillspot.com (these guys had really fast shipping at a reasonable price). We ended up getting a 1 5/8" coupler for the transmission side, a 1 1/8" coupler on the motor side, and a matching spider insert. We've taken our disassembled clutch plate piece to a machinist, and had him cut it down to 1 5/8". We will then be able to fit the clutch plate into the transmission Lovejoy. The couplings pieces are pure aluminum, weigh just over a pound each, and are held in place by a key. Our spider insert is made of rubber and weighs less than half a pound.

The mated motor and transmission.

There's also a video on youtube.com

Sunday, November 23, 2008

Kelly Controller Test

We wired up the Kelly Controller for a test run. We ended up reusing the leftover wires from the ICE. A little snipping, splicing, soldering, and electrical tape and we were done. It was actually very detailed work and we had to rewire the connection a couple of times because the 11 exposed wires kept touching each other and shorting the circuit. We used our AC to DC (soon to be DC to DC) converter as the power source.

The controller came with a CD that enabled the user to configure the controller. Bill bought an adapter to hook into his computer and was able to set the parameters for controller

The lights are on. That means it's working.

Saturday, November 22, 2008

Kill Switch

I've mounted the kill switch just under the steering wheel through the steering column. I used a 2" piece of left over angle iron to fasten the wires with leftover nuts and bolts from the engine. The wire goes through the firewall sharing the same hole as the wires from the instrument cluster.

Monday, November 17, 2008

Saturday, November 15, 2008

Installing the Rear Battery Racks

These are the three rear battery rack inside the trunk mounted just above the spare tire area. The two battery racks in front are welded together. They are fastened through the wheel walls. The longer battery wrack in back is fastened to two trunk supports. The are also fastened to each other with two pieces of 6" angle iron welded together. We simply inverted the angle and placed them on the two battery wracks. I used undercoating on the angle iron as well to dampen the vibration from the road.
I then installed 12 of the 20 batteries.

Tuesday, November 11, 2008

Interior Reinstallation

One of the more notable problems of the 1990 Plymouth Laser is road noise while traveling. Keeping this in mind, my uncle Bill had some left over sound dampening carpet material from his drum room which we installed underneath Sparky's carpet. I have to give Lance crap about the 'salmon' colored carpet material.
The back seat, plastic trim panels, and dash were then reinstalled. The door panels and headliner still need installing. We ordered new headliner because the high pressure power washer did an exceptional job cleaning everything off of the old headliner. We're also contemplating installing a computer in the stereo space, but that's far down the road.

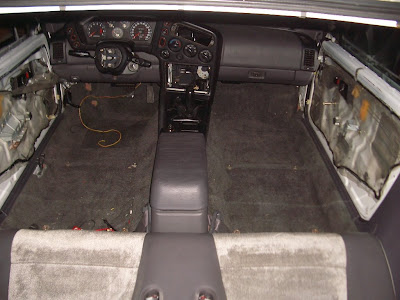
The instrument cluster was tested before reinstallation. Three bulbs were burned out. Another trip to the junk yard and the problem was easily fixed. The new wires from the 12V, 120V, and 500A gauges were sent through the clutch hole in the firewall. The lights for these gauges, you can see the yellow and black wires on the floor, will go to the interior fuse box.

Miscelaneus Painting

To make the vehicle look more professional, we ended up painting a few things. The battery racks were the first to be painted. I did two base layers of flat black paint and three layers of black undercoating to damped any vibrations and hinder wear and tear.

I will also paint the underside of the wheel wells with the black undercoating. One of the last jobs will be painting the roof of the vehicle with the flat black paint.

Our outside window molding on the passenger side had deteriorate down to the metal. In order to make everything look nice, I cleaned and painted both the driver's side and passenger's side molding with flat black paint and then with the black undercoating. I love undercoating.
I also decided to clean the manual windows and discovered a clicking noise from the driver's side window as it rolled up and down. Upon removal and further examination, I discovered the crank spring to be broken. We ordered a used manual driver's side window regulator from B and R Auto Wrecking and reinstalled the window.