Thursday, November 27, 2008

New Headliner

While power washing all the fabrics and headliner, the fabric came off. So we ordered more fabric. We bought some adhesive spray and used household staples to fasten the fabric to the headliner shell. Then we used up the last of the sound dampening material for the backside. It was a tight fit. The sound dampening material was a bit thicker than the original backside material.

Lovejoy Couplings

Lovejoy coupling has arrived from drillspot.com (these guys had really fast shipping at a reasonable price). We ended up getting a 1 5/8" coupler for the transmission side, a 1 1/8" coupler on the motor side, and a matching spider insert. We've taken our disassembled clutch plate piece to a machinist, and had him cut it down to 1 5/8". We will then be able to fit the clutch plate into the transmission Lovejoy. The couplings pieces are pure aluminum, weigh just over a pound each, and are held in place by a key. Our spider insert is made of rubber and weighs less than half a pound.

The mated motor and transmission.

There's also a video on youtube.com

Sunday, November 23, 2008

Kelly Controller Test

We wired up the Kelly Controller for a test run. We ended up reusing the leftover wires from the ICE. A little snipping, splicing, soldering, and electrical tape and we were done. It was actually very detailed work and we had to rewire the connection a couple of times because the 11 exposed wires kept touching each other and shorting the circuit. We used our AC to DC (soon to be DC to DC) converter as the power source.

The controller came with a CD that enabled the user to configure the controller. Bill bought an adapter to hook into his computer and was able to set the parameters for controller

The lights are on. That means it's working.

Saturday, November 22, 2008

Kill Switch

I've mounted the kill switch just under the steering wheel through the steering column. I used a 2" piece of left over angle iron to fasten the wires with leftover nuts and bolts from the engine. The wire goes through the firewall sharing the same hole as the wires from the instrument cluster.

Monday, November 17, 2008

Saturday, November 15, 2008

Installing the Rear Battery Racks

These are the three rear battery rack inside the trunk mounted just above the spare tire area. The two battery racks in front are welded together. They are fastened through the wheel walls. The longer battery wrack in back is fastened to two trunk supports. The are also fastened to each other with two pieces of 6" angle iron welded together. We simply inverted the angle and placed them on the two battery wracks. I used undercoating on the angle iron as well to dampen the vibration from the road.
I then installed 12 of the 20 batteries.

Tuesday, November 11, 2008

Interior Reinstallation

One of the more notable problems of the 1990 Plymouth Laser is road noise while traveling. Keeping this in mind, my uncle Bill had some left over sound dampening carpet material from his drum room which we installed underneath Sparky's carpet. I have to give Lance crap about the 'salmon' colored carpet material.
The back seat, plastic trim panels, and dash were then reinstalled. The door panels and headliner still need installing. We ordered new headliner because the high pressure power washer did an exceptional job cleaning everything off of the old headliner. We're also contemplating installing a computer in the stereo space, but that's far down the road.

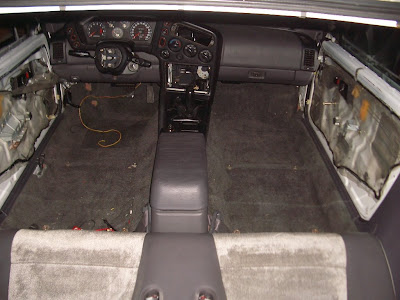
The instrument cluster was tested before reinstallation. Three bulbs were burned out. Another trip to the junk yard and the problem was easily fixed. The new wires from the 12V, 120V, and 500A gauges were sent through the clutch hole in the firewall. The lights for these gauges, you can see the yellow and black wires on the floor, will go to the interior fuse box.

Miscelaneus Painting

To make the vehicle look more professional, we ended up painting a few things. The battery racks were the first to be painted. I did two base layers of flat black paint and three layers of black undercoating to damped any vibrations and hinder wear and tear.

I will also paint the underside of the wheel wells with the black undercoating. One of the last jobs will be painting the roof of the vehicle with the flat black paint.

Our outside window molding on the passenger side had deteriorate down to the metal. In order to make everything look nice, I cleaned and painted both the driver's side and passenger's side molding with flat black paint and then with the black undercoating. I love undercoating.
I also decided to clean the manual windows and discovered a clicking noise from the driver's side window as it rolled up and down. Upon removal and further examination, I discovered the crank spring to be broken. We ordered a used manual driver's side window regulator from B and R Auto Wrecking and reinstalled the window.

Saturday, October 25, 2008

AC Box

We installed an AC box because Sparky didn't come with one. This picture is before we installed the AC box. We acquired the box used from a local junk yard wicked cheap, something like $12. While both the heater and AC duct were out, we tore back some of the black foam padding you see in the passenger compartment and removed most of the wires going to the engine CPU and now obsolete engine parts.

We also acquired a vacuum reservoir at the junk yard for a whole $2. Can you say sweet!

Monday, October 13, 2008

Pot Box

Our pot box was created using a 0-5,000 ohm's slider pot box mounted with two screws in a 1"X9" box metal frame with a reused spring from the clutch pedal. Total cost $5.00.

Wednesday, October 8, 2008

The Coupler, Our Biggest Hurtle

How to mate the motor to the transmission and spend as little money as possible. Through more extensive research, we determined that we needed a coupler to connect the transmission to the motor, a mounting plate, and a spacer plate.

The mounting plate and spacer plate were easy to acquire at a local metal shop. We bought a 60/61 (tough) 15"X15"X1/2" plate of aluminum for under $50 for the mounting plate on the transmission bell housing. We have yet to buy the spacer plate. The reason being, we'd like to verify the distance between the motor shaft and transmission shaft after the coupler is acquired.

We explored a few different options on acquiring a coupler.

1. Buying a prefabricated coupler, mounting plate, and spacer plate ($1000+)
http://www.evparts.com/
2. Creating our own coupler through local machine shops (I was quoted a minimum of $600).
3.
Using a keyed sprocket which we would weld to a thick pipe and then weld to the clutch plate. All has to be accurate to .001" (too difficult if you're not a machinist).
http://www.surpluscenter.com/
4. Use a Lovejoy connector welded to the clutch plate. Again, we'd have to be accurate to .001" (too difficult)
http://www.drillspot.com/
5. Use an Atra-Flex coupling. (less than $200)
http://www.atra-flex.com/

We're going with either the Lovejoy connector or Atra-Flex coupler. These sound like the best and most inexpensive options for our beginner needs.

Monday, September 29, 2008

60 Feet of 2/0 Gauge 600V Battery Cables, Crimper, Cable Connectors, Shrink Wrap

60 feet of 2/0 gauge 600V battery cables. As soon as this arrived, we assembled a couple of cables and hooked them up to a battery and the motor, and took it for a test drive. It was a success, and pretty scary seeing how immediately the rpms took off on this 166lb motor.
Crimper, cable connectors, shrink wrap

Thursday, September 25, 2008

Fuse, Shunt, Contactor, and Inertia Switch

500A 300VDC Shawmut Fuse, Shunt, and Albright SW-200 250A Contactor

Ford standard Inertia Switch

Oil, Fuel, and Temperature Gauges

We replaced the stock oil, fuel, and temp gauges with 12V, 120V, and 500A gauges. The gauges were a bit snug, so we had to bore out the holes and the old plastic screw fasteners with an knife. The wiring for the new gauges had to go through the back of the gauge panel. So, we drilled a two inch hole through the back and were careful not to go through any of the delicate wires. The wires will then be go to the Kelly controller, the auxiliary battery, and the inside fuse box. We removed the glass coverings on each of the new gauges because the plastic protective covering would not snap back onto the gauge panel.

Sunday, September 21, 2008

Vacuum Pump

12V/8A Vacuum Pump (the little noise maker)

Circuit Breaker

10,000V Max Circuit Breaker

Wednesday, July 30, 2008

We're unsure of the best way to create a coupler, spacer plate, and mounting plate. So we bought some 1/2" plywood to use as templates. We drilled bolt holes in the mounting plate to match the transmission bell housing and a two inch hole in the middle to allow for the coupler. To figure out where to drill the holes, we used old, thick motor oil leftover from our ICE and rimmed the bolt holes on the bell housing. Then we stuck the plywood onto the bell housing which created a mirror image. It sounds easier than it looks.
Here's the motor side spacer plate mated to the motor using 4 bolts. Again, we had a bit of trouble, but managed to find the holes.

Wednesday, July 9, 2008

Wednesday, June 25, 2008

Battery Racks

We created 6 battery racks using old bed frames found on Craigslist.com. The angle iron was perfect for supporting each 73lb battery. We cut the angle iron to the premeasured lengths, grinded off the paint, and had Bill's friend from work weld the iron together. Not bad for a total cost of $0.
We mounted 3 battery racks in the trunk which will hold 12 of our 20 batteries. We originally were going to countersink the racks and mount them directly through the bottom metal using nuts and bolts. However, the bumper shock absorbers and frame prevented us from going this route. In the end, we fastened the battery racks with nuts and bolts through the wheel well walls, and trunk supports, and to each other. It seems like a crazy idea, but those puppies aren't moving. We chose this method over welding thinking we may upgrade the batteries later and would have the option of removing the racks completely.

Undercoating

We then sprayed black rubberized undercoating into the engine compartment, underside of the hood, and trunk area to reduce noise.


Sunday, June 1, 2008

Waiting for Parts

Where getting more comfortable researching electrical vehicle components and have started placing orders from the internet. Ebay is a great place to shop for the more inexpensive parts. While waiting for parts, we're researching the best possible and least expensive way to mate the motor with the transmission.

We also have to switch out the power steering rack with a manual. There are ways to tweak the power steering for our needs, but we decided against it.

Then, there's always cleaning eighteen years of dirt and grime off the vehicle. The cleaning part seems like a constant battle. As soon as I remove a piece from the vehicle, it and where it belongs needs cleaning.

I feel bad for not including a picture in this post, so here's the clutch we cut out. Sparky is a clutchless electric vehicle.

Thursday, May 22, 2008

Research and Spending $$$

We have done some extensive research online trying to gain a better understanding of our project from other people's conversions. Gav's New Zealand Electric Conversion was a great overall breakdown of a conversion. Also, Don's EV page helped with wiring and a parts list. There is a wealth of information on the internet about electric vehicle conversions.

Wednesday, May 21, 2008

Taking Apart and Cleaning

The very next day, we all went to town on the vehicle. We removed all the internal combustion components from the engine and drained most of the fluids. Lance and I then cleaned all the oil, grease, and road grime from the engine bay using a heavy degreaser, a few rags, and a pressure washer hose. It only took 3 washes. Then we decided to give the outside of the car a bath using the same degreaser, rags, and pressure washer. Another two washes and man what a difference.
We also removed most of the interior of the vehicle. Over the next few days, we be cleaning the plastic interior trim pieces, carpet, seats, door panels, and headliner with a high pressure washer hose to see if we can remove that cigarette smoke smell. The trunk trim pieces were also removed. We cleaned the trunk, and will reinstall the plastic trim pieces to optimize space to install twelve batteries. Bleach was used to clean the dirt and road grim from the interior metal of the vehicle. What a difference! I now wish I took before pictures.

Saturday, May 17, 2008

Let's convert an internal combustion engine vehicle to an electrical vehicle!

Our conversion team consists of Bill, Dave, and Lance. Our goal is to convert an internal combustion engine vehicle into an electric vehicle for under $10,000. Here we go!

After cruising Craigslist.com for vehicles, we decided on a 1990 Plymouth Laser from Vancouver, WA as our conversion vehicle. The car had a blown piston and a nasty cigarette smell, and came with a Chilton (1990 Plymouth Laser Handbook), but was otherwise flawless. For a price of $400, who could say no?